I finally had a break this week to be able to make this reading tent/fort for Alison. I got the idea here, but since we know I hate paying for patterns, I thought "I can do that" and came up with a plan. What I got was a large (this one is 30"+ across) hula hoop. A pretty queen flat sheet, and a queen 40x80 sheer curtain. I also had a large button, elastic hair tie, 4 - 50" ribbons, and coordinating thread. Oh, and a hook to hang it from the ceiling.
So I did nto pin, because it was too much fabric, I went ahead and just started sewing. I took the long side of the sheet and folded it over about 3" and sewed a straight line.
I then went and did a zig zag, because I know this will bee stability. Just do one side of the sheet. make sure you fold it correctly so the right side will be on the outside and the wrong on the inside.
Now, decide what side you want the door to open on. I wanted it to open to the right, so I found that side of the sheet and put the right side of the sheet to the right side of the curtain and sewed down. Do not sew over the openings at the top. You will need those!
I also zig zag stitched down for security, leaving the top open. You will then sew down about 20" on the other side.. this will keep your fort together. Do not sew the whole length of the curtain, just enough to hold it closed, but you want your little one to be able to get in and out. Also, my curtain happened to be the same length has the sheet width. So I did not have to cut it at all and hem it. But you should measure them to see if you need to trim any curtain, and then hem the bottom.
This is what you will have when you are done attaching the curtain.
Here is my Hula Hoop. I tore off all of the stickers going around it because they were pretty lose all ready.
I was thrilled to see that this was just stapled together and had a plug.
I used a staple puller and pulled out the staple that was holding it together.. then I dumped all the noise makers that were inside in the trash. I double checked to maek sure they were not something I could reuse, but they were not.
Now feed your hoop thoough the top.
When you are done it will look like this. You will need to secure up the opening to make sure it stays in place.
I just used electrical tape. It doesnt look pretty but this will be hidden.
This is what you will now have.
Start attaching your ribbons. I did one ribbon on the openings on each side of the curtain. Use extra knots to make it secure, I left some hanging down because I thought it would look girly. This is where you do what you think will look best.
As you noticed I used different colored ribbons, again with all the color in this tent I figured that would look nice. For the two ribbons that did not have openings already I just used scissors to poke a hole through and tied the ribbons on. I tried to position them equally around the hoop, but there is some give because you can move them around.
Now figure out where to hang the fort. and put hook in the ceiling.
Gather your ribbons together and tie a very secure knott. You will do this where you want it to hang from.
Hang from the hook.
Now its time to attach your button and hair tie. This will be used as a way to hold the opening open. I tied the thread to the hair tie very tightly, then figured out where I wanted to put the button.
Start sewing on the button, you will want to have the hairtie on the other end and attach them at the same time. This will make it all secure.
hair tie sewn on with thread used to sew on button.
Now you can open the fort and keep it open.
I wanted something that would keep the fort open a bit, so I took two small nails and nailed them to the wall. I use this trick with curtains too. It will keep them in place without being obvious.
Here is the top..
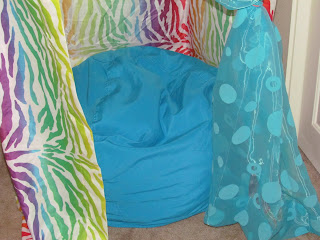
And I added a matching bean bag on the inside. I think it might be just a little too small, but it will work :)
And you have a happy little girl!

Here is the finished product. With a larger pillow or bean bag at the bottom it would stay open more. The whole project cost less than $50. I was going to make a pillow, but found the bean bag for reasonable and decided to just go with that. You can do this in any color and design, be creative! These are great for boys and girls :) Happy Crafting!


neat idea....I want one for me :)
ReplyDelete